4. Defect mapping acquisition
Fault mapping is acquired by signal processing using measurement gates.
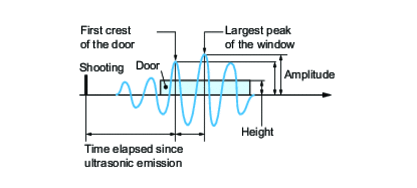
The gates measure the transmitted or reflected A-SCAN signal to automatically associate two digital values with each point: a time and an amplitude.
The amplitude measured is either that of the largest signal peak in the gate, or that of the first peak in the gate.
The time measured is the time between ultrasound emission and the appearance of the largest signal peak in the gate, or that of the first peak in the gate (figure 9 ).

Exclusive to subscribers. 97% yet to be discovered!
You do not have access to this resource.
Click here to request your free trial access!
Already subscribed? Log in!

The Ultimate Scientific and Technical Reference
This article is included in
Plastics and composites
This offer includes:
Knowledge Base
Updated and enriched with articles validated by our scientific committees
Services
A set of exclusive tools to complement the resources
Practical Path
Operational and didactic, to guarantee the acquisition of transversal skills
Doc & Quiz
Interactive articles with quizzes, for constructive reading
Defect mapping acquisition
Directory
Organizations – Federations – Associations (non-exhaustive list)
ACMA (American Composites Manufacturers Association) http://www.acmanet.org
AFNOR (Association Française de Normalisation) www.afnor.fr
Exclusive to subscribers. 97% yet to be discovered!
You do not have access to this resource.
Click here to request your free trial access!
Already subscribed? Log in!

The Ultimate Scientific and Technical Reference